Making the pattern without breaking the mould worked well.
This is another tip how to locate the point of sprue and riser in the cope part. There are a few methods such as marking the sand or just measuring the center point. I used two small aluminum tubes placing them into the sprue and riser well and then carefully placing the cope part on top only to create the mark on the cope for the sprue and riser.


After the sand mould was ready I turned on my furnace and in 50 minutes my crucible was full of molten aluminum alloy ready to be poured. I really wanted this casting to turn out well and it did.
I opened the flask after it cooled down and there it was....my first aluminum alloy ray gun.
The ray gun casting had a bit of shrinkage on one side of the handle and that is a result of the runner being too narrow. When casting a chunky part of aluminum it is really recommended to leave a sufficient sized runner and a large sprue and riser to feed the cooling aluminum in the mould cavity. Another tip is to always use a bit extra aluminum, better to much then to little resulting in a ruined casting.
In the image you can see the left over aluminum in both castings turned back into ingots.


I was very happy with the first ray gun casting and I gave it a bit of a cleaning and a light polishing on the buffing wheel.
Another tip: when using a buffing wheel always wear a face shield and hold the aluminum object firmly as I recently discovered how quickly it can fly out of your hands :-)


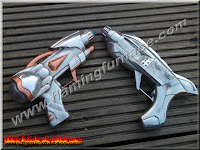
The next casting I made was of a different ray gun replica. I made this sand casting quickly, something that is not good practice. I also didn't create a well and runner system for the riser so the casting has a few appearance defects but no issue of shrinkage this time.


This time I decided too add a bit of copper color to the ray gun using paint. I think it looks really cool now. ........Time to vaporize someone with my new ray gun.. :-)


