Its been 3 months since my last post so I am back now with a few new aluminum castings and more tips and images. In this post I am showing my casting of an aluminum sun. This is a link to my first aluminum sun casting. The pattern I used for this casting was a clay sun that I varnished so it would be easier to remove it from the sand mould and to achieve a good finishing. For this large casting I made a new timber flask as you can see in the images. The flask dimentions are 390mm x 390mm x 80mm. Because it's a large flask this is a good tip to keep in mind: when working with such a big flask it is good practice to create inner "ribs" for the flask or just to make a few grooves with an electric router, any way is good. It is very annoying when you work hard on your sand moulding and just as you are about to place the cope on top of the drag all the sand falls out.
The sand moulding was very easy to make and I was able to lift the sun pattern without damaging the sun impression in the sand. The inner ribs also worked very well and the petrobond didn't fall out of the flask. I also got another bag of petrobond and in the images you can see the differance in the color. After many uses petrobond turns dark brown vs orange color for new petrobond.
My first sand mould was perfect but when I was finishing it I got distracted and forgot a very important thing, I didn't place my clamps on the flask. Here is a very important tip: The clamps or just a weight on top of the flask will prevents the molten metal from lifting the cope part (Hydrostatic pressure) and resulting in a pool of molten metal on the floor also burning the flask if it's constructed from timber. This causes a casting defect called FLASH (see flash image circled in red).
I made a lot of castings till this day and never forgot the clamps, so this can easily happen and can be very dangerous if you don't keep safety in mind. Because I always cast in the open on dry sand no harm was done. The only annoying part was to cut off, file and grind the casting FLASH. *** In the future I will post info explaining in more detail the most common casting defects***
My second casting was very sucessful, I didnt forget the clamps this time... :-)
On the top image 3rd from the left you can see the two sun castings. On the left is the sun from my first casting after cleaning the flash defects and giving it a bit of a polish and the right sun is the second casting which turned out to be a very good quality casting with zero defects. I drilled two holes in the sun and attached it on my garden wall with my eagle castings.
Welcome to my FlamingFurnace, backyard metal casting blog.
Hi everyone, I mainly focus on metal casting projects using recycled ♻ scrap aluminum and other accessories in the pattern creations.
Aluminum is a very versatile material and I would like to promote the awareness of aluminum recycling via different metal casting projects.
Feel free to check my YouTube channel where I provide detailed explanations, tips & tutorials for best backyard aluminum casting methods, homemade foundry equipment & of course the importance of safety when working with molten aluminum.
So remember recycle and Enjoy my blog ;-)
August 12, 2011
May 17, 2011
Sand Casting Ray Phaser, Solid Aluminum
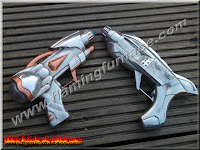
In this aluminum casting I made a replica of two different water guns. The problem that I had here was that if I tried to open the plastic casting of the water gun I would probably break it. Casting a two half pattern is a very easy process and the finishing is better then using a one piece pattern. My decision was to try creating the sand mould using the gun as one part. The only difference in using a full part is it's more time consuming by carving the sand around pattern half way without braking the sand mould.
Making the pattern without breaking the mould worked well.
This is another tip how to locate the point of sprue and riser in the cope part. There are a few methods such as marking the sand or just measuring the center point. I used two small aluminum tubes placing them into the sprue and riser well and then carefully placing the cope part on top only to create the mark on the cope for the sprue and riser.
After the sand mould was ready I turned on my furnace and in 50 minutes my crucible was full of molten aluminum alloy ready to be poured. I really wanted this casting to turn out well and it did.
I opened the flask after it cooled down and there it was....my first aluminum alloy ray gun.
The ray gun casting had a bit of shrinkage on one side of the handle and that is a result of the runner being too narrow. When casting a chunky part of aluminum it is really recommended to leave a sufficient sized runner and a large sprue and riser to feed the cooling aluminum in the mould cavity. Another tip is to always use a bit extra aluminum, better to much then to little resulting in a ruined casting.
In the image you can see the left over aluminum in both castings turned back into ingots.
I was very happy with the first ray gun casting and I gave it a bit of a cleaning and a light polishing on the buffing wheel.
Another tip: when using a buffing wheel always wear a face shield and hold the aluminum object firmly as I recently discovered how quickly it can fly out of your hands :-)
The next casting I made was of a different ray gun replica. I made this sand casting quickly, something that is not good practice. I also didn't create a well and runner system for the riser so the casting has a few appearance defects but no issue of shrinkage this time.
This time I decided too add a bit of copper color to the ray gun using paint. I think it looks really cool now. ........Time to vaporize someone with my new ray gun.. :-)
May 08, 2011
Sand Casting Aluminum ashtray / bowl
This is a casting I made of a glass ashtray (pattern). In this post I refer to it as a bowl because I am not a smoker. The only small problem was that the inside part of the glass bowl was curved in, so if I would sand mould the glass bowl the way it is the sand mould would break while lifting the cope part, so my solution was to use filler inside the ashtray and smooth the curve the other direction. After the filler was dry I used fine grade sand paper and two coats of clear varnish over it to prevent the sand from sticking. Using glass as a pattern is great because it is very easy to remove it from the sand and the finishing is superb quality. The only thing is while ramming it have to be careful not to break the glass with the rammer.
Here is another small tip: As I've mentioned before always preheat your ingot tray and foundry tools that come into contact with the molten aluminum. Another thing that won't do any harm is to preheat the aluminum scarp or ingots before adding them into the crucible. Molten aluminum is 660C° and higher. Two things can happen if parts are not preheated , one is the safety aspect regarding molten metal splashing out of the crucible and the other is thermal shock or "aluminum freeze". The aluminum in the crucible just turns rock hard and back into a molten state after a few minutes.
The aluminum bowl turned out very well now I just have to think of where to put it : -)
April 29, 2011
Flamingfurnace.com, Aluminum Plaque
This is a special aluminum casting to celebrate my new flamingfurnace.com Domain.
At this stage I'm building my first CNC router machine and it will probably take me sometime to finish it. I found a cheap and easy solution to make my plaque pattern. I used 8mm MDF routing it all around. As for the letters, I got childrens sticky foam letters in a local supermarket (very cheap). After marking the pencil lines for the letters all that was needed was to stick them into place. As past experience tought me MDF is not the best material for a pattern so this time I gave it a few coats of clear varnish and that did the trick.
After the pattern was ready I constructed a new flask from some scrap timber. Flasks dimentions: W.600mm H.170mm and the depth is only 80mm (40mm cope 40mm drag) because the pattern is only 12mm in thickness.
I started making the sand mould and I was hoping that the gaps I left between the letters and the overall thickness of the letters would be sufficient enough to prevent the sand from sticking between the gaps when lifting the pattern out of the sand.
I don't know if I mentioned this before, but if the sand is being rammed too hard it will stick to the pattern when lifting the cope part.
If the sand is rammed to lightly the mould might break and the casting appearance will be damaged.
The trick is to find the right ramming strength balance.
Sometimes a bit of trial and error is needed ;-) .
In this casting I didn't use a gating system for the sprue and riser. I only used the sprue and riser feeder extension (pressure head) to prevent aluminum shrinkage. The aluminum feeders really work, I made two identical test castings of aluminum eagles. For the first one I used a sprue riser extension and the other without. The eagle casting without the feeder had shrinkage in a few spots. The eagle casting with the sprue and riser feeder was perfect.
In the images you can see three aluminum spikes on the back of the plaque, those are the locations of the venting holes to allow gases out preventing casting defects.
The plaque turned out very well without any shrinkage or major defects. Plaque size: 495x75x12mm. All the extra aluminum was casted back into ingots. I used again my new buffing wheel with the brown buffing compound. In the image of the cut sprue and riser you can see they did their job by "feeding" the aluminum casting.
It's a bit hard to see in the images the shiny finish of the letters but I can see my reflection in them.
I took this image after painting the aluminum plaque with copper paint.
Subscribe to:
Posts (Atom)