Welcome to my FlamingFurnace, backyard metal casting blog.

Hi everyone, I mainly focus on metal casting projects using recycled scrap aluminum and other accessories in the pattern creations.
Aluminum is a very versatile material and I would like to promote the awareness of aluminum recycling via different metal casting projects.

Feel free to check my YouTube channel where I provide detailed explanations, tips & tutorials for best backyard aluminum casting methods, homemade foundry equipment & of course the importance of safety when working with molten aluminum.

So remember recycle and Enjoy my blog ;-)

December 09, 2014

Aluminum star casting using a homemade foundry + tutorials

It has been some time since my last post as I was very occupied for the past year. In this post I will share with you how I have created a solid aluminum star from scrap aluminum.
For the sand mould I used a plastic star pattern and oil bonded sand to create the sand mould.
All  the homemade foundry and foundry equipment that I used is D.I.Y.

Using this type of pattern is very easy to sand mould, one disadvantage is its not a split pattern so the sand mould process  takes a bit longer.
All that you need to start is to construct the foundry flask to hold the sand and either use foundry green sand or foundry oil bonded sand, and of course to construct a foundry ;-)...

So in the next set of images you can see the sand mould preparation process before and after removing the star pattern.

In the next images you can see the sand mould after separating the cope from the drag part of the foundry flask. The sand mould turned out very well so the next step was to create the gating system for the molten aluminum to fill the inner cavity and that will form the solid aluminum star casting.
In the next set of images you can see the aluminum casting "shakeout process", in other words to open the flask and either have a nice casting surprise or a  flop.....
foundry flask after aluminum pour
Well the casting turned out very well so all that was left to do is clean all the access aluminum and give the aluminum star a semi polish finish.
aluminum star casting and foundry patternAluminum star casting using homemade foundry
In this post I wrote a bit less then I usual do.... :-) as I have created a 2 part aluminum casting tutorial so feel free to view, like, subscribe.
Aluminum star casting part 1 (sand mould preparation):


Aluminum star casting part 2 (pouring the aluminum):

July 24, 2013

Recycling aluminum cans into name plates / paper weights

It's been a while since I posted a new project, time is very scarces these days and things I like to do are pushed aside by day to day tasks. This post is about how I turned used scrap aluminum cans into something new. My work colleagues collected aluminum drink cans for me for the last few months. I decided to make them something useful and I came up with ......Individual paper weights for each of them with their name initials on them.
Unfortunately I don't have a small CNC machine, something that I hope to buy or build one day. So my second option was  to make the foundry patterns from A-Z.
As for the material for the patterns I decided to use 18mm MDF, and yes I know it's not a really "fun" material to work with but its easy to shape and for this type of pattern it was perfect.
So first I decided what radius to make the aluminum name plates, then I made a rough cut with a jig saw around the marked radios. From a previews job I already had a perfect circle cut so I used it as a template for all the name plates.
The next part was all done with my electric router, first I shaped the pattern into a perfect circle using a template and a router "Flush Trim bit", then I made another MDF Jig in order to create the pattern middle radius recess, for this job I used "Straight bit" + router collar.
After I created all the pattern inner circles (the same depth as the letters 3mm) I used a "Chamfer  bit" to create a decorative 45° angle on the top side of the pattern.
After creating the pattern I covered the MDF with putty then sanded it to a smooth finish. After I got rid of the horrible MDF fiber texture it was smooth enough to stick to the foam letters. The last part was to give the patterns a few coats of paint and varnish. The paint and varnish really contribute to achieve a very good sand casting and aluminum casting results.
This first series of images illustrates the pattern making stages:
foundry pattern foundry pattern foundry pattern foundry pattern
After the pattern was finished I moved to the next stage, creating the sand casting cavity for the molten aluminum to fill. I used oil bonded sand for this casing to achieve a higher finishing quality. Making the sand mold was a very easy process as its just a flat pattern made from one part. When I carefully removed the pattern from the sand the sand was left with a perfect impression of the patterns.
One mistake that I did was ramming the sand in the flask cope part to lightly as result there was a bit of a crack in the sand that I chose to ignore (mistake). The problem occurred when I was pouring the molten aluminum into the sand mould cavity. The molten metal lifted the sand up like a cake in the oven. What I should have done is create the cope part again or place some weight on top of the sand, that would of prevented it from rising.  The casting defect that I have created is called "flash" and it could have been very easily avoided.
Next set of images are from the first casting session:
foundry sand casting foundry sand casting foundry sand castingfoundry sand casting foundry sand casting
I could of just left it the way it was but it was annoying me that the base side of the name plates was uneven, one side of the plates base was higher then the other side. Unfortunately I also don't have a Lathe machine and using a hand grinder was out of the question. I decided to make another sand casting this time paying more attention to details from A-Z including a better gating system using some scarp hard wood as a gating pattern.
The second casting was perfect with very good casting results.
Next sets of images are from the second casting session.
foundry sand castingfoundry sand casting foundry sand casting foundry sand casting aluminum casting aluminum casting
As this was a very good casting It didn't  take me long  too clean all the excess aluminum. Using metal file and electric sander I got it to a stage ready for polishing. For the polishing part one needs a lot of patience as it takes time to make it shiny. I used aluminum brown and blue buffing compound.
The end result was good enough for me and I gave it as a present to my work colleagues. Now they have a fancy paper weight for their desks :-)
aluminum casting aluminum polish aluminum casting aluminum casting
This is a short video that  I made of the aluminum name plates, creation stages:

March 21, 2013

Scrap Aluminum for the Homemade Foundry

In my previous posts I went over how to setup a homemade aluminum foundry. This post will be dedicated to the subject of what scrap aluminum would be ideal for the homemade foundry.  At this stage I have melted many aluminum alloys from different objects.
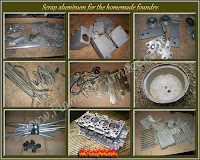
scrap aluminum for the homemade foundry
One of the main things that makes this odd hobby fun is taking used aluminum items and recycling them into something new, for example the decorative animal shapes that I made for my kids room I made from an old pressure cooker. Its very easy to order online ready processed aluminum ingots however I think it takes away from the fun of looking for scrap parts and processing them from scratch into something new. There are many types of aluminum objects made from different alloys that can be used by the amateur metal caster. On the image at the left you can see different types of objects that I melted into clean aluminum ingots. For example an aluminum scooter, brackets, pressure cooker lid, baby pram frame, flood light frame, electric box cover, door handles, solid aluminum engine block, ladder parts, engine piston and old antenna tubes. Another point to rise is that for many metal casting hobbyists there is no need really to segregate the aluminum alloys for a simple reason, not too many people are casting in their back yard, Aluminum parts such as engine pistons that requires unique grade of alloys because of the unique mechanical purpose of the object. Most homemade foundry metal casters that are doing it for a hobby will usually create decorative objects that will sit on the shelf or be hung on the wall that's why it doesn't really matter the alloy segregation. However after saying that it is a good practice to make the metal casting from the same alloy if possible.

cutting aluminum engine block into 4 parts before melting it
What I can recommend as a good source of aluminum is car engine parts. I got from a friend a broken engine block.  My main problem is that my foundry and crucible are too small for such a big part of aluminum. I started by taking a heavy hammer and breaking  all of the engine block edges, after I cut it into 4 chunks of aluminum that would fit into my crucible. I got a fair amount of aluminum from this aluminum engine block. All the metal parts pose no issue as once the aluminum turns molten its very easy just too scoop them out before pouring the molten aluminum into the ingot mold.

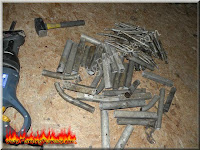
One source of aluminum I wouldn't really recommend to collect and melt is aluminum tubing. The volume of aluminum to be extracted is very low and the time consumption of the melting session is just not worth it.
breaking aluminum engine block aluminum engine block cut into 4 parts aluminum scrap in crucible engine block scrap in crucible aluminum ingots and engine block metal scrap


When running a homemade foundry it's always  good practice to make the sand mold first and after to light up the foundry melting clean ingots. Using clean ingots may increase the odds of a good aluminum sand casting without the need too skim too much impurities out of the molten metal in the middle of the session.  Also working with clean ingots will dramatically decrease casting defects. In the next images you can see an example of an old flood light, broken aluminum light frame and after skimming all the impurities and pouring the clean aluminum into ingots. The ugly blob of dross is all the impurities such as old paint and dirt.
aluminum scrap in foundry crucible cutting aluminum tubesrecycling aluminum in a homemade foundry
removed from foundry crucible engine block metal scrap aluminum ingot pile
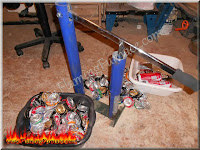
The next thing I decided to try is an experiment on how much aluminum I can extract from melting drink cans. I know I don't recommend it in my site safety statement but again this is for educational purpose ;-) I started by making a primitive can crusher by welding some scrap metal. The more compacted the cans are the less space they take in the crucible and it is quicker feeding them into the crucible. For my drink cans melting experiment I collected 2.5 K.G of aluminum drink cans. Melting cans is a very quick and easy  process once the foundry reaches the adequate temperature. The down side is too much impurities that needs to be skimmed out from the top of the molten metal, very frequently.
I got a total of 1.5-KG aluminum and 1-K.G Dross (scrap impurities).
drink can crusher recycling aluminum cans 2.5KG aluminum cans into 1.5KG-ingots  1KG-dross homemade foundry aluminum dross