Welcome to my FlamingFurnace, backyard metal casting blog.

Hi everyone, I mainly focus on metal casting projects using recycled scrap aluminum and other accessories in the pattern creations.
Aluminum is a very versatile material and I would like to promote the awareness of aluminum recycling via different metal casting projects.

Feel free to check my YouTube channel where I provide detailed explanations, tips & tutorials for best backyard aluminum casting methods, homemade foundry equipment & of course the importance of safety when working with molten aluminum.

So remember recycle and Enjoy my blog ;-)

August 14, 2021

 Turning A Cheap Axe into a Viking Style Axe

I just posted a new video where I took an old axe and turned it into a cool looking Viking axe style, I have used first time metal etching in this project, and sand casting to create the new solid aluminum handle. As always all the aluminum used is from recycled old parts, Feel free to check my YouTube video below with all the steps and don't forget to tap on like, subscribe or just leave a comment ;-).


The first step was to create the new Viking axe design, I used basic material's to create the shape such as WD40 metal can, duct tape roll and T-Pex pen pen to mark the lines. I have also removed the old handle easily by drilling the axe head. 

Step 1: designing the Viking axe shape
Making a Viking axe style from a cheap axe/hatchet

Step 2: removing the old cheap handle

Step 3: using and angle grinder cutting the shape of the Viking axe

Once the shape was cut with an angle grinder I did some sanding with a flap disc and sand paper

Step 4: Oil heat treatment of the Viking axe head, for extra strength and durability

Step 5: creating the sand mold and casting the aluminum into a sand mould with the Viking axe head inside. The aluminum casting turned out very well just required some light cleanup ;-).

 Step 6: To create extra support of the axe head to the new casted aluminum handle I used my bench drill, drilling two holes and welding x2 metal pins for extra strength, then cleaned the surface with angle grinder and you could never guess there are 2 pins welded
Making a Viking axe style from a cheap axe/hatchet and aluminum handle casting

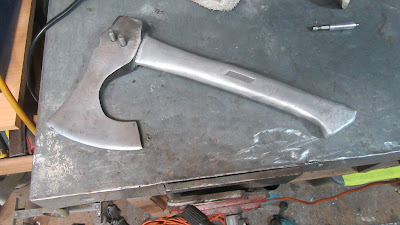
After the metal pins welding and cleanup on both sides
Making a Viking axe style from a cheap axe/hatchet

Step 7: I used metal etching with a 12V car battery charger, salt and lemon to create two words in (ancient Paleo (1200BC) Wiki) - one words refers to "Good" and the other word "Evil", I thought its symbolic as an axe can be used as a weapon in times of war and other times just for survival/camping to chop wood. I used electrical tape and Tipp-ex pen to create the words and shapes across the Viking axe head.


Metal etching with basic materials


First look after short etching, this was just my first test next time I might do deeper metal etching

Step 8: After a bit of aluminum polish I used a Paracord to wrap around the axe handle (simple west country whipping) and lastly sharpened the axe blade a bit, and that's it turned out very cool ;-).


Ready to chop some wood


August 18, 2020

Electrolysis Rust Removal Tutorial

In this Electrolysis Rust Removal Tutorial I used an old rusty adjustable spanner just to demonstrate how efficient this method is, absolutely fantastic for home DIY use, work place or any restoration projects. The setting is very basic and takes 5 minutes at a very low cost once you have an old battery charger lying around or even a spare mobile charger. Most important is not to get confused with the Positive (+) and Negative (-) connections ;-). Feel free to check my YouTube channel, Like, Subscribe or drop me a comment below my video.

Feel free to check my other Rust Removal videos on my YouTube channel


Below you can see the before and after results after 1 night of electrolysis de-rusting, the duration depends on the level of rust, for light rust a few hours is more then enough, for heavy rust over night or more might be more suitable. After the electrolysis is done a bath of vinegar is recommended for the de-rusted part, makes it easier to clean all the electrolysis left over residue. The adjustable spanner below was covered with rust over 4 years.


After the de-rusting process is complete I would recommend to cover the part with some lubricating oil, alternatively spray paint it after the cleaning as it will oxidize very quickly if not treated.


December 31, 2019

3D Printing addition to this blog 💥

Wow its been over a year since I last posted on my blog, this year was super busy with my full time job, finishing my last year of psychology in collage and crazy busy family life, time just flies. So I didn't have much time for metal casting this year but I did find some extension to this hobby that I will probably incorporate into my future metal casting. Around Jan' this year I purchased my first 3D printing machine of Creality CR-10S,
 I did some printing this year and I would like to share with you some of the more interesting ones. Majority of my 3D printings I downloaded from Thingiverse web site, remixing some and  others I have created using the fantastic Tinkercad easy to use app for 3D design, electronics and coding. So long story short I am far from being an expert in relation to 3D Printing but I know more then what I knew last year ;-).

My most recent 3D Printing was of a Star Wars Rebel Escort ship (Remix) from the creator Colin 300zxcolin full credit goes to him for sharing the files. I felt ready to try a larger size print and it turned out awesome, I used white and grey filament and will probably spray paint it at some point in the future. On the left you can see the finished print. As a huge Star Wars and Star Trek fan I did some previous space ship prints but nothing compares to the scale of this one, I have replaced and added front swiveling cannons, swiveling missile launchers, turret tower guns (borrowed from the empire death star ㋡), Side missiles, round turrets, internal connections support and rebel alliance legs. The software that I use to scale/slice and prep all STL files is the amazing Cura software.


Another cool 3D print (credit to MakerBot for sharing the files) was a present for my father in law that is a huge fan of Jurassic park and is fighting cancer, the print of a T-Rex skull including the stand, I used a gold filament for the skull and grey for the stand and it turned out very well, the T-Rex looks very well decorating his sitting room now and most important made him happy ;-).


One thing I learned about this print is to make sure that there is a good infill % for small areas such as the T-Rex teeth that I had to super glue 2 of them after as I yanked them off with the support.


The print on the right is my pride and joy as this was the first experiment I did with Photogrammetry, I took 80 photos of a wooden statue - The Legend of the Yogi Man (Orang Malu) also known as “The Weeping Buddha” or “Shy Man Buddha". I had the wooden statue over 10 year in my sitting room and it was perfect opportunity to try the Photogrammetry with a nice round object. I used Autodesk ReCap Photo software to generate the 3D shape from the puzzle of images, when I saw it the first time it was like magic, taking something from the real world and replicating it into a 3D object that can be manipulated in size and other features.

 I experiment with a couple of prints and the best part there is no need for any support for this 3D printing and the final result is really cool, especially with high infill it makes the print feel heavy and chunky when holding it.


In the print below I tested Photogrammetry with another statue and it turned out ok but the details where not as good as the first single Yogi statue, I figure I had to take more images from more angles so the final 3D object is more complete.


I plan to try at some point next year to use some of the 3D plastic printings into metal casting, one of the main advantages of the 3D printing where before it took me hours to make for example a pattern of a sign now I can quickly design and print the pattern. 

October 30, 2018

Styrofoam skulls into solid aluminum - (Lost Foam Casting) ♻


In this video/tutorial I created a solid aluminum wreath skulls for Halloween, I used the Lost Foam casting method with my home made furnace to make the aluminum casting, the process is super simple and the preparation of the casting mold is very quick.

As always I am recycling ♻ old aluminum scrap into something new, most important is promoting the recycling awareness by providing different ideas for projects. 

How To Make - Solid Aluminum Ghost Mask - Halloween Decoration ♻

In this video I have created a solid aluminum ghost mask for Halloween and a small mummy statue, I started with a plastic ghost mask like the one in the horror movie Scream, I created the pattern using plaster and varnish (to prevent the sand from sticking and to get better casting results). The solid aluminum ghost mask turned out amazing.
All my aluminum, castings are done using a homemade furnace and scrap aluminum. So as always my main message is to create awareness of recycling and to inspire to try and re-use ♻ 

Halloween Skull decoration into solid aluminum - Lost Foam Casting ♻

In this tutorial video you can learn how to create your own aluminum skull-bones ☠️ decoration for Halloween or just for the fun of it, ;-)

As always I am recycling old scrap aluminum into something new, most important is promoting the recycling awareness by providing different ideas for projects ♻

Special Zombie Apocalypse - Spike Ball Aluminum Lost Foam Casting

Spike ball for zombie apocalypse - In this video I will show you the stages of how I made an aluminum spike ball using lost foam casting method. The aluminum casting turned out very well and surprisingly ;-), the handle is made from scrap metal such as bolt, nuts metal loop and old fishing chain.
As always I am recycling old scrap aluminum into something new, most important is promoting the recycling awareness by turning this waste into something new. I hope you enjoy the video feel free to like subscribe or drop me a comment ;-)

Silly Paper Weight - Lost Foam Aluminum Casting

This is a short video of my lost foam aluminum casting experiment, I just glued some art and craft Styrofoam ball I found in a local craft shop. This silly project gave me idea for my next video - coming up soon demonstrating how to cast solid aluminum medieval spiked ball. As always all my metal casting projects are made from recycled aluminum, the main purpose of my videos is to increase recycling awareness. I hope you enjoy the video feel free to like subscribe or drop me a comment.

Lost Foam Aluminum casting - Heart Chain

In this video I will show you how to create a solid aluminum Valentine's Hearts chain using (polystyrene) lost foam casting process, as always I am recycling old scrap aluminum into something new, most important is promoting the recycling awareness and what can be done with waste aluminum.

July 26, 2016

Solid aluminum pistol casting from recycled scrap aluminum.

This is the 1st part of how to cast a solid aluminum pistol using a homemade furnace and recycled scrap aluminum.

This is the 2nd part of how to cast a solid aluminum pistol using a homemade furnace and recycled scrap aluminum.

February 22, 2015

Aluminum boat cleat casting using a homemade furnace + tutorial of this project.

Hi everyone, so this is my first post for 2015, in my last post I made a tutorial of how to prepare a sand mould using a solid pattern. In this post I will explain how I made a solid aluminum boat cleat using a split pattern with my homemade furnace.
I have also created  another tutorial this time explaining how to create the split pattern for this type of aluminum casting.
This special request came from my brother that is taking a course in becoming a yacht skipper.
He doesn't have a Yacht yet.... but a boat cleat is a good start ;-)
So first I have made a quick sketch design using Google Sketchup.
After I had some idea and plan as to how I want the pattern to look like I started making it using MDF as the main material for the pattern. The split pattern is constructed from 2 half's of 18mm MDF. 
The pattern size is 100mm height, 300mm width & 36mm in depth.  I started by making a template of the boat cleat transferring it to a sheet of 8mm MDF, once I had the template and the desired shape cut with a jigsaw I used the template as a guide for my electric router, I transferred the boat cleat shape into the 2 parts of MDF by using the template. As I did not have a long enough straight bit for my router (+36mm) I used 2 bits, a short straight bit and a flush trim bit with bearing running it around the template. It took a bit longer but the end result was satisfying and accurate.

(Just a quick note as how I connected the 2 split parts,  I connected the 2 parts of MDF with small pins making sure they will not be in the way of the router bit. )

After the pattern was complete the same pins are used to align the 2 half's when placed into the foundry flask, it is very important to make sure that the 2 parts are aligned accurately for a good aluminum casting results.
Next step after creating the boat cleat pattern from the MDF : I used my table router to round all the corners and create a groove in the MDF pattern giving it a depth and much more of a 3D attractive look.
In the next images you can see the stages and the different bits that I have used for the table router.
MDF is a great and easy material to shape, however as it is made from medium density fiber there are a few important highlights: 1st - its important to work with dust extractor and a good mask avoiding inhalation of the MDF dust. 2nd - as MDF has very rough edges when being cut it is important to seal the MDF pattern, I used a wood filler to improve the angle (Draft's) of the pattern and after the wood filler was dry I sanded the MDF pattern using different grades of sand paper until a smooth finishing was achieved. Last thing that I did was coating the pattern with gloss varnish, I had concerns that I will not be able to separate the 2 half's as I varnished the pattern with the 2 half's connected but to my surprise it was very easy to separate between the two sides and from this point the pattern was ready to be used for the sand mould.
At this point the split pattern was ready after adding 2 coats of varnish, the surface was glossy and smooth, I made the sand mould using a wooden flask & oil bonded sand for a good finishing. I did have some concerns that the sand mould might break around the straight sections of the pattern but the sand mould turned out very well with minor damages when I removed the split pattern.
After removing the split pattern from the sand mould I created the gating system in the sand, a poor gating system can lead to casting defects so this is a very important stage when preparing the sand mould, once the gating system is complete it is ready to be filled with molten aluminum.
Next I closed and clamped the flask and started to heat my homemade furnace, after the aluminum was in a molten stage I poured it into the flask and opened it after 1 hour, the solid aluminum boat cleat turned out very well with minor imperfections that were very easy to clean and fix.

In the next set of images you can see the solid aluminum boat cleat after taking it out from the sand mould. I used a reciprocating saw with a metal blade to quickly cut off the risers. Last part was to clean the aluminum casting and give it a light polish.


Here is my tutorial video with most of the steps, creation of the sand mould and the actual molten aluminum pouring creating the solid aluminum boat cleat, enjoy:

And here are a few images of the finished aluminum boat cleat.
aluminum casting of a boat cleat aluminum casting of a boat cleat